User Documentation
This document provides guidance and information about:
1. How Do I Sign Up for an Apollo Instance?
2. What Data Files Are Required To Create Genome Tracks In Apollo?
3. How Do I Prepare My Data Prior to Upload?
4. How Do I Generate a Public-Key?
5. How Do I Upload Data and Create a Genome Track via the Command Line?
6. How Do I Upload Data and Create a Genome Track via the Apollo (browser) Interface?
7. How Do I Make My Genome Public?
8. How Do I Manually Annotate My Genome In Apollo?
1. How Do I Sign Up for an Apollo Instance?
Only project administrators can add or remove user accounts.
To add a user account:
- Log into the Apollo Instance via the Apollo browser interface using your credentials
- Click on the “User” tab
- Click on “+ Create User”
-
Click on the “Detail” tab and add the following information:
- First Name
- Last Name
- Password
- Role: Choose from “user” or “admin”
-
Click on the “Groups” tab
- Assign the user to a group (optional)
- Assign the user permissions for an organism. This can only be done after the organism has been added to the Apollo Instance
2. What Data Files are Required to Create Genome Tracks in Apollo?
This section provides a list of the available file formats that can be used with Apollo.
Table 1. Required Data Files for Genome Track Creation.
| File Format | Description | Requirement |
|---|---|---|
| Fasta | Genome Reference File | Mandatory |
| Fai | Genome Reference Index File | Mandatory |
| Gff3 | Genome Annotation File | Mandatory |
| Gff3.gz | Genome Annotation Compressed File | Mandatory |
| 2bit | Genomic Sequence in Binary File | Optional |
| Bam | Alignment File | Optional |
| Bai | Alignment Index File | Optional |
| Vcf | Variant Calling File | Optional |
| Vcf.gz | Variant Calling Index File | Optional |
| bw | A compressed, indexed, binary format of genome-wide signal data | Optional |
3. How do I Prepare My Data Prior to Upload?
Apollo is a Genome Browser. It allows you to visualise evidence from analyses on a genome, create and edit genes, and create and edit annotations on those genes. To allow you to view the genome in your Apollo Instance, the reference genome in FASTA file format and the genome annotation in GFF file format are required. The reference genome can be obtained from the public repository or generated from any genome assembly workflow. The genome annotation describes genes and other features of DNA, RNA and protein sequences. The genome annotation can be generated using any genome annotation workflow. For the evidence files such as alignment file (BAM), variant file (VCF) and genome coverage file (Bigwig), they should be prepared using the appropriate workflows before uploading into your Apollo Instance.
This section outlines the steps required to prepare data files to create a genome track in Apollo. In order to create tracks in your Apollo Instance you must provide the 'mandatory' files listed in Table 1 :
-
Organism files:
- Genome reference file (fasta, fa, fna)
-
Genome reference indexing file (fai). It can be yielded from
running the following command in the
Samtools suite of programs:
> samtools faidx [species.fasta] -
Genome sequence file in binary format (2bit). The 2bit file
can be created using the following command in the
faToTwoBit program:
> faToTwoBit [species.fasta] [species.2bit]
-
Genome annotation files:
- Genome annotation file (gff3) generated from the annotation process.
-
Genome annotation compressed file (gz). This file can be
compressed by running the following commands in the
Samtools suite of programs:
            > bgzip [species.sorted.gff3]


            > tabix -p gff [species.sorted.gff3.gz]
-
Evidence track files:
- Alignment file (bam)
-
Alignment index file (bam). The index file can be yield from
running the following commands in the
Samtools suite of programs:
> samtools index [species.bam]Note: Please make sure the reference sequence header (ID) does not contain any space in your bam file. Jbrowse can't capture the space in the reference sequence ID within BAM file.
- Do the followings if there is a space in your reference sequence ID within your bam file.
          > samtools view -H example.bam > header.sam


          > sed -i 's/PUT_YOUR_REMOVAL_STRING_WITH_SPACE/ /g'
          header.sam


          Example : if the original reference sequence ID is formatted
          with space (i.e chr1 species1), the space between chr1
          species1 needs to be removed.


          Usage : sed -i s/ species1/ /g' header.sam (Note: there is a
          leading space in front of species1)


          > samtools reheader header.sam example.bam


> samtools index example.bam -
Variant files:
- Variant calling file (vcf) generated from the variant calling process.
-
Variant calling index file (vcf.gz). The variant calling index
file of the variant calling file. The index file can be
created running the following commands in the
Samtools suite of programs:
            > bgzip [species.vcf]


            > tabix -p vcf [species.vcf.gz]
-
BigWig files are compressed, indexed, binary format of genome-wide
signal data. They can be created by running the following commands
in the
bedtools suite of programs:
        > bedtools genomecov -ibam -bg -split -strand + -I
        [species.bam] -g Chrominfo.txt > [species.plus.bedGraph]


        > bedtools genomecov -ibam -bg -split -strand - -I
        [species.bam] -g Chrominfo.txt > [species.minus.bedGraph]


        > bedGraphToBigWig [species.plus.bedGraph] Chrominfo.txt
        [species.plus.bw]


        > bedGraphToBigWig [species.minus.bedGraph] Chrominfo.txt
        [species.minus.bw]
4. How Do I Generate a Public-Key?
- The Project Administrator is required to share a public-key to securely transfer data into their Instance via the command line. For more information about public-key cryptography, you can view here .
- To create a public/private rsa key pair on your Unix/Linux/MacOS/Windows system, run the following commands on your local machine (the computer that you will be accessing the Apollo Instance from):
- After running the above command, a passphrase (essentially a password) will be requested. You can either leave this blank by hitting return/enter or create a passphrase to recall for future use of the key pair.
- The following command sets permissions for the .ssh/:
-
The following command outputs your public key to the terminal
and saves the public-key file
firstname_lastname_key.pubin~/.ssh/: - You can now copy the file to a convenient location. Choose one that is accessible to your mail client, such as the Desktop, by running the following command:
-
Send the details of your public-key to the Apollo Service Team
via return email or by sending an email to
apollo-support@genome.edu.au
with the subject header "Public-key for Apollo Instance".
Please note, an automated response to this email will be
signed off by one of our partners, the ARDC Support Team.
Please also note that you should never give out the
private-key (i.e. the
firstname_lastname_keyfile). Following the creation of your Instance and the addition of your public-key, login credentials will be provided to you.
> ssh-keygen -t rsa -f ~/.ssh/firstname_lastname_key
> chmod 600 ~/.ssh/firstname_lastname_key
> cat ~/.ssh/firstname_lastname_key.pub
> cp ~/.ssh/firstname_lastname_key.pub ~/Desktop
5. How Do I Upload Data and Create a Genome Track via the Command Line?
Data to support your genome annotations can be uploaded via the command line or terminal on your local machine. This method is recommended for data files that exceed 2 GB. If your data files are less than 2 GB, you can also upload them via the Apollo (browser) interface. To ensure you can create the visual representation of your genome in the Apollo Instance, known as a genome track, there are a minimum number of evidence files that are required. The files that are 'mandatory' for genome track creation are listed in Table 1 .
- To access your Instance, you will need to create a public-key to share with the Apollo Service Team for the creation of a login. If you have not yet received your login credentials, email your public-key file to the Apollo Service Team with the subject header "Public-key for Apollo Instance". Please note, an automated response to this email will be signed off by one of our partners, the ARDC Support Team.
-
You can login to your Apollo Instance with your credentials
with the SSH command as follows:
> ssh -i /path/to/your/private_key_file username@example.genome.edu.au -
For example, for the username, 'doe_user', with a host name,
'ocean.genome.edu.au', and a private key file,
'jane_doe_key', stored in their /.ssh/, they would use the
following command to copy files from their local environment
to their Apollo Instance:
> ssh -i ~/.ssh/jane_doe_key doe_user@ocean.genome.edu.au -
Once access has been granted, your prompt will indicate that
you are in your apollo instance (e.g.
username@apollo-0##:~$). Navigate to the folderapollo_data. To do this, you can use the following commands:
> cd /home/data/apollo_data -
While in the folder
apollo_data, create a new folder for your organism namedorganism_Ausing the following command:
> mkdir organism_A -
Now you can transfer your data files into this folder. To
copy a single file into your new folder,
organism_A, navigate to a new terminal prompt connected to your local environment and run:
> scp -i ~/.ssh/jane_doe_key organism_A.fa doe_user@ocean.genome.edu.au:/home/data/apollo_data/organism_A/ -
To copy a complete directory of files in a folder, including
subfolders and their files to the
organism_Afolder you can use:
> scp -i ~/.ssh/jane_doe_key -r organism_A_files/ doe_user@ocean.genome.edu.au:/home/data/apollo_data/organism_A/ -
Navigate into the folder named
organism_Aand make sure the genome reference file (fasta and faidx) and the annotation file (gff3 and gff3.gz) are in this folder. -
To ensure the tool/command is available in the environment
you are in, you can run:
> export PATH=/opt/Apollo-2.6.x/jbrowse/bin:$PATH
Note: replace x with the Apollo version (i.e. Apollo-2.6.5) in your instance -
Prepare the config file with the following commands:
        > prepare-refseqs.pl --fasta [organism_A.fa]


        > flatfile-to-json.pl --tracklabel [organism_A] --key
        “organism_A” --gff organism_A.gff3 --trackType
        CanvasFeatures --type CDS --autocomplete all


        > generate-names.pl


        > ln -s data/tracks tracks


        > ln -s data/seq seq


        > ln -s data/trackList.json trackList.json


        > ln -s data/names names
-
You can follow the instructions on page 7 in this
document
to complete the creation of your reference genome. These
are:
- Navigate to your Instance via the browser interface and log in
- Go to 'Organism' tab in the bottom right-hand-side of the 'Annotator Panel'
- Select (+) 'Add New Organism'
- Fill out details, i.e. Name, Genus, Species, Directory, etc.
- Click on 'Create Organism'
- At the top of the annotation panel, select the 'Tracks' tab for your organism of interest. You should now see genome tracks in the visualisation window.
6. How Do I Upload Data and Create a Genome Track via the Apollo (browser) Interface?
This method is recommended for data files that are less than 2 GB, if your data files exceed 2 GB, you can upload them via the command line . To ensure you can create the visual representation of your genome in the Apollo Instance, known as a genome track, there are a minimum number of evidence files that are required. The files that are 'mandatory' for genome track creation are listed in Table 1 .
NOTE: The speed of loading reference genome will be very slow if the reference genome is created via Jbrowse interface. It might not be noticeable if the size of reference genome is small. Use prepare-refseqs.pl tool to create reference genome via the terminal if possible. This perl script splits the reference genome sequence into chunk (default: 20kb), and the loading speed of the reference genome/tracks in Jbrowse will improve greatly. This script is available on the Apollo instance. See here for more details.
- Log into your Apollo Instance
- If the Apollo Instance is newly built, please follow the instructions below to:
- upload your reference genome
- upload your tracks once your reference genome upload is complete.
- In the 'Annotator Panel' to the right-hand side of the view and click on 'Organism' tab.
-
Click on the "Upload New Organism" buttom at the bottom of
the right-hand side panel

-
Follow the instruction on the pop-up menu to upload your
reference genome
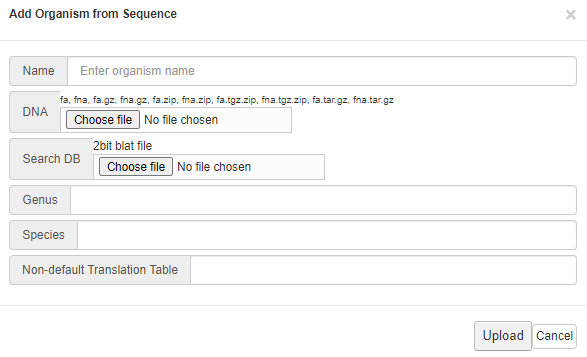
- Click on "Upload" button when finished
-
In the 'Annotator Panel' to the right-hand side of the view
and click on 'Tracks' tab
- Click on “New Track” button
-
Select Track Type
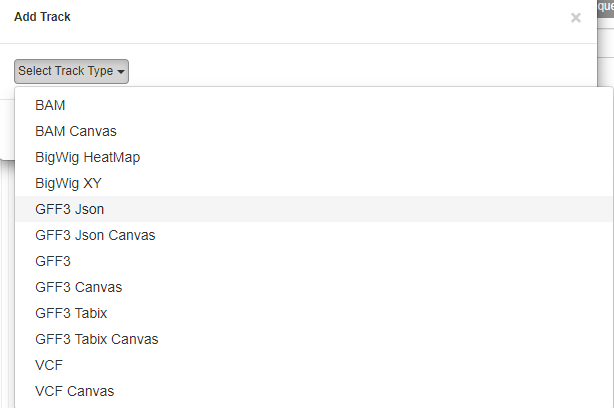
-
Provide the information of the upload track (i.e GFF3)
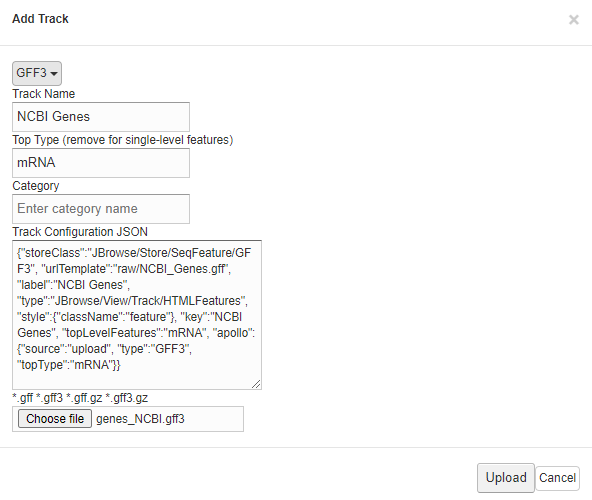
- Click On "Upload" button when finished
- Log into your Apollo Instance
- In the 'Annotator Panel' to the right-hand side of the view and click on 'Organism' tab.
- Tick the 'Public' box at the bottom of the 'Details' tab.
- At the top of the 'Annotator Panel' above the tabs is a dropdown box to the right of a chainlink icon, select the organism from the dropdown and click on the chainlink icon.
- You should be offered the 'Public URL' in a new window. Right-click on 'Public URL' to select the link and copy the address to share the genome publicly.
- You can direct users to select the organism they wish to view by clicking on the options available on the left-hand side once accessing the link using a public URL. If only one organism is available, this organism will be shown.
7. How Do I Make My Genome Public?
A genome can be published via your Apollo Instance (browser) interface:
8. How Do I Manually Annotate My Genome in Apollo?
Detailed documentation on the use of Apollo for manual annotation can be found in the Apollo User's Guide. See also tutorials on manual genome annotation and Apollo in the Training and Help Resources tab.